More actions
(The post-install Libreboot experience) |
(I think moving this to a dedicated Install section may be useful.) |
||
| (2 intermediate revisions by the same user not shown) | |||
| Line 14: | Line 14: | ||
You will likely see '''SeaBIOS''' included with these ROMs, which is heavily comparable to your BIOS/UEFI screen - it selects which device to boot from, simply. Pictured is the menu of which you will be prompted. | You will likely see '''SeaBIOS''' included with these ROMs, which is heavily comparable to your BIOS/UEFI screen - it selects which device to boot from, simply. Pictured is the menu of which you will be prompted. | ||
'''NOTE:''' After your first Libreboot, you are more than likely able to flash repeatedly afterwards without having to use a Pomona Flash Clip (below). | |||
Depending on your device, the flashing experience may and inevitably, at times, '''will''' vary. '''<u>Please check for your BIOS chip device on the Libreboot website.</u>''' | |||
=== Steps to Install === | |||
As it is the easiest distribution to use, this guide assumes you are using [[Debian]] to Libreboot your machine using the Dell OptiPlex as an example. See below for an easier method for that specific device. | |||
* '''Install flashprog and the lbmk repository -''' Follow the instructions on the [https://libreboot.org/docs/build/#sources Libreboot wiki] to use '''lbmk''' and build the image from source. For a Dell OptiPlex 9020, your image '''should be named''' "'''dell9020mt_12mb'''." after compilation. | |||
** '''Flashprog''', too, must be made from source - clone [https://review.sourcearcade.org/flashprog.git this repository] and follow [https://flashprog.org/wiki/Downloads these directions]. | |||
** Libreboot '''warns against the usage of flashrom.''' You may use it, and according to '''Leah Rowe, it is almost exactly the same -''' however, flashprog is actively maintained. | |||
== Specific Device Tips == | == Specific Device Tips == | ||
| Line 23: | Line 34: | ||
* This may sound simple, but please be careful - the process of doing this is slightly hazardous. | * This may sound simple, but please be careful - the process of doing this is slightly hazardous. | ||
In a traditional process, the firmware blob is split into two portions to be flashed onto the SOIC-8 microprocessors. While this will likely work, the very process of not only doing it ''right'' with accounting for which processor is which but also the safety of connecting the flash clip may not be worth the extra hassle. It is especially risky on a device like this to make a mistake. | In a traditional process, the firmware blob is split into two portions to be flashed onto the SOIC-8 microprocessors. While this will likely work, the very process of not only doing it ''right'' with accounting for which processor is which but also the safety of connecting the flash clip may not be worth the extra hassle. It is especially risky on a device like this to make a mistake. | ||
(I will soon fill this out properly, as the process is very easy the first go-around but I will need to repeat it for authenticity's sake.) | (I will soon fill this out properly, as the process is very easy the first go-around but I will need to repeat it for authenticity's sake.) | ||
Latest revision as of 19:58, 8 June 2024

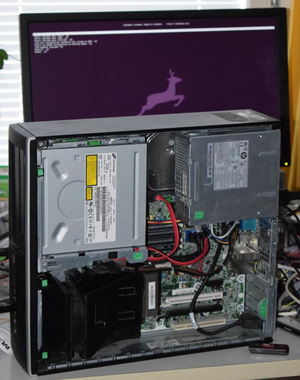
As per convention for most Linux beginners and intermediates alike, the action of "Librebooting" a personal machine is nothing short of a commonality. Founded by Leah Rowe, the Libreboot project aims to create libre "boot firmware based on coreboot, replacing proprietary BIOS/UEFI firmware" and, through this simple yet imperative step to true privacy, one can achieve true digital freedom.[1] It is centered around the elimination of the threat of the Intel Management Engine (IME/Intel ME), which has been infamously speculated to be a potent spying device. Libreboot is based on the coreboot project, and aims to simplify the process of installing it on one's system.
This article has been peer-reviewed for validity, written based on the dangers of hardware-level spying in using Libreboot as an example.
Libreboot experience
Upon finally installing Libreboot (if you haven't already, see the guides below!), you will likely be met with multiple ROM types to choose from:
- textmode - Solely renders your BIOS and other bootloaders in text mode. If you want to install FreeBSD, this is a requirement as FreeBSD will not install on a framebuffer and face bugs.[2]

- corebootfb - Provides a graphical framebuffer, which is suitable for using tools like Ventoy for managing your ISO files. However, most tools, including Ventoy, also support text mode either way.
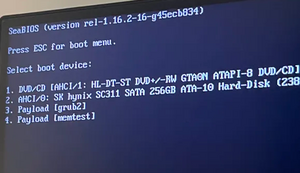
You will likely see SeaBIOS included with these ROMs, which is heavily comparable to your BIOS/UEFI screen - it selects which device to boot from, simply. Pictured is the menu of which you will be prompted.
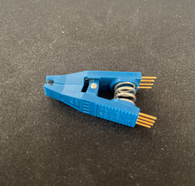
NOTE: After your first Libreboot, you are more than likely able to flash repeatedly afterwards without having to use a Pomona Flash Clip (below).
Depending on your device, the flashing experience may and inevitably, at times, will vary. Please check for your BIOS chip device on the Libreboot website.
Steps to Install
As it is the easiest distribution to use, this guide assumes you are using Debian to Libreboot your machine using the Dell OptiPlex as an example. See below for an easier method for that specific device.
- Install flashprog and the lbmk repository - Follow the instructions on the Libreboot wiki to use lbmk and build the image from source. For a Dell OptiPlex 9020, your image should be named "dell9020mt_12mb." after compilation.
- Flashprog, too, must be made from source - clone this repository and follow these directions.
- Libreboot warns against the usage of flashrom. You may use it, and according to Leah Rowe, it is almost exactly the same - however, flashprog is actively maintained.
Specific Device Tips
Dell OptiPlex 9020 SFF - Easier Method

In a talk with Leah Rowe herself, there is little to no need for the popular, yet expensive, Pomona Flash Clip. According to Dell's own user manual for maintenance of the device, there are four pins near the RAM slots that allow for the read-only flag of the BIOS to be removed with one female-to-female jumper wire. Thus, this allows the override of the boot image.
- This may sound simple, but please be careful - the process of doing this is slightly hazardous.
In a traditional process, the firmware blob is split into two portions to be flashed onto the SOIC-8 microprocessors. While this will likely work, the very process of not only doing it right with accounting for which processor is which but also the safety of connecting the flash clip may not be worth the extra hassle. It is especially risky on a device like this to make a mistake.
(I will soon fill this out properly, as the process is very easy the first go-around but I will need to repeat it for authenticity's sake.)
